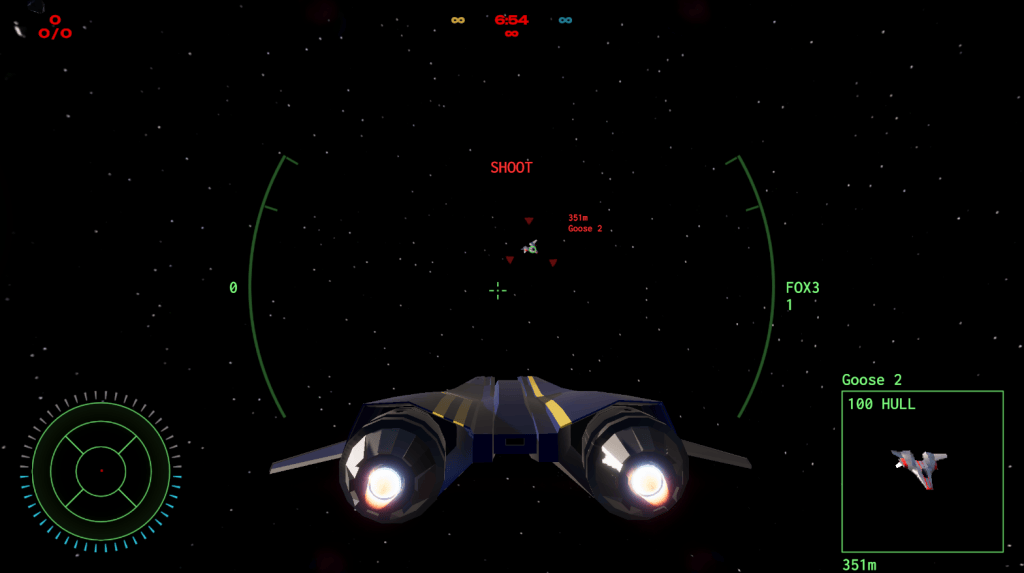
This is an early-access look at the mechanisms and gameplay behind the video game version of my TTRPG Super Bandit. Details can and will change with each stage of development.
HUD
Your heads-up display (HUD) tries to be as minimal as possible while still providing you the info you need to do some of that pilot shit.
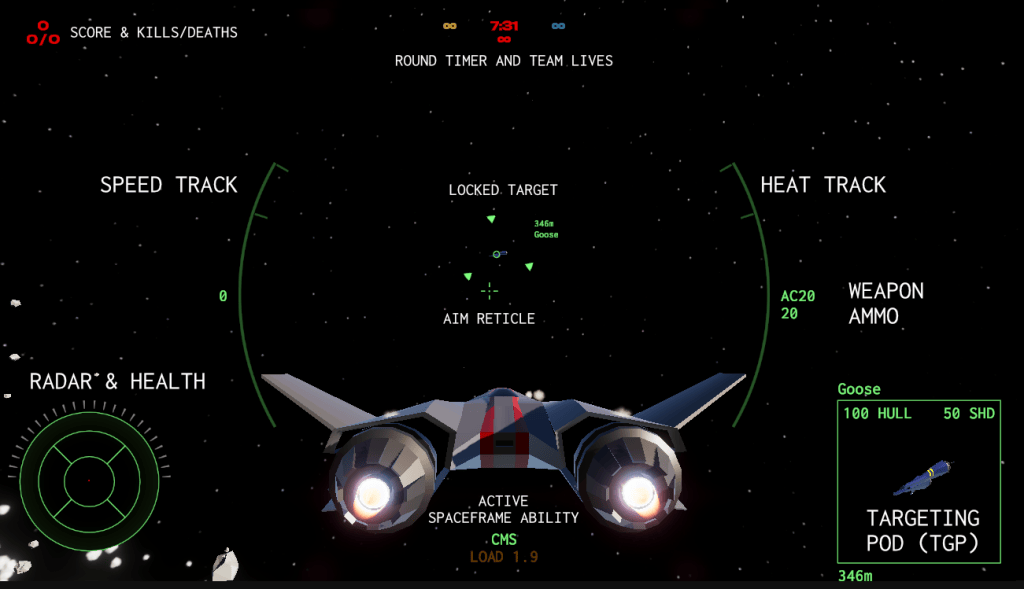
- Aim Reticle: This is where your starfighter’s nose – and therefore its selected weapon – is pointing.
- Locked Target: Locking a target marks them red on your radar and gives you an offscreen direction indicator. It also gives you a little bit of aim assist when your reticle is on target.
- Radar: Your radar shows the relative position, distance, and signature of all contacts within your sensor range. More on this below.
- Hull (and shields): Your starfighter’s hull integrity and shields (if equipped) are represented by ticks in an arc around your radar.
- TGP: Your targeting pod shows your locked target’s hull, shields, range, and name.
- Speed Track: The center-left arc on your HUD displays your current speed and whether you have boost and/or drift enabled.
- Heat Track: Your center-right arc shows your starfighter’s current heat level. When this maxes out, you will automatically deploy radiators to cool off. This leaves you slow and vulnerable. You can deploy radiators early to manage your heat on your own terms, or enter drift mode to reduce heat slightly.
- Weapon/Ammo: Your selected weapon and its ammunition (if relevant) are shown here. This readout is replaced by an indicator when your radiators are deployed.
- Active Spaceframe Ability: Some spaceframe abilities must be activated. Their active state and cooldown are shown here.
The Match HUD
Everything in the list above is diagetic to your starfighter – it exists “in-universe”. The “Match HUD” shows information related to the game mode. It’s data for you, the player, not necessarily the pilot.
- Round Timer & Team Lives: This shows how much time remains in the match. Time limits are set by the host in the session lobby. If your game mode uses limited lives, these will be listed here. Finally, any mission objectives are displayed in this area.
- Score and K/D: Your score, kills, and deaths are shown here.
- Killfeed: The upper right corner shows who got blown up, who blew them up, and what they used to blow them up.
Flying
There are two flight modes in Super Bandit: Assisted flight (the default) and drift mode. You can set which mode is your default in the game settings.
Assisted Flight
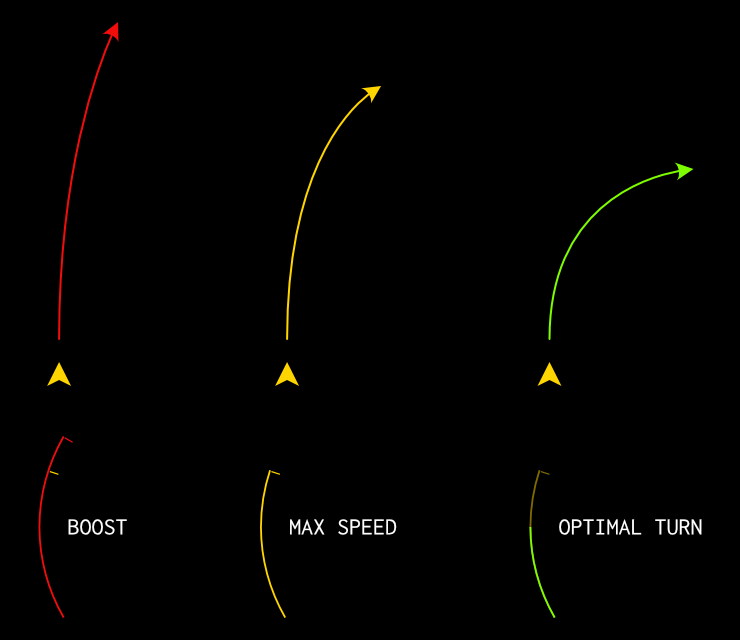
In assisted flight, your starfighter flies like a plane in space. Your ability to maneuver is limited by two things:
- RCS Thrust: Your reaction control system has a maximum rotation or turn rate.
- G-Force: Your starfighter will not let you turn fast enough to harm yourself.
When your G-force is limiting your turn rate, you will hear your pilot breathing heavily. Reduce your speed to bring your turn rate up to your RCS thrusters’ max. Your speed track will light up green when you have reached an optimal turn/speed ratio.
Assisted flight assists more at high speeds. At low speeds you can make larger lateral adjustments using your RCS thrusters without entering drift mode.
Drift Mode
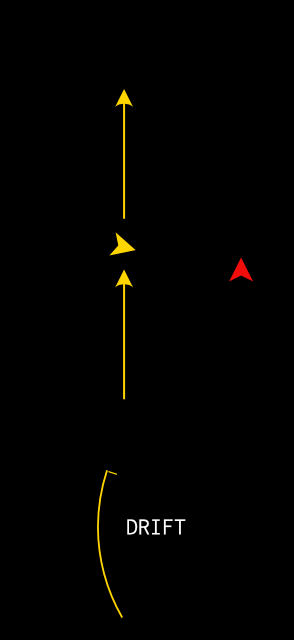
Hold your drift mode button to decouple your starfighter’s facing from its heading. Get creative.
Targeting
You can’t shoot what you can’t find. Your starfighter’s sensors help you do that, but there are some key concepts to understand first.
- Contact: Any “radar dot”. Different shapes represent different types of contacts – capital ships, escape pods, starfighters, etc. Larger dots are closer to you.
- Sensor Range: Your radar/sensors only display contacts out to a maximum distance. This distance is tuned for gameplay, not realism. Pretend there is an invisible layer of passive electronic warfare happening at all times.
- Weapon Range: Your weapons have an effective maximum range. Yes, I know Mass Effect told us railgun rounds travel forever, but your CPU doesn’t like it when it has to track all that.
- Signature: This is the big one. A contact’s signature represents how easy they are to pick up on sensors (your base signature) combined with their current heat levels. Hotter targets can be locked faster and from farther away. Drifting cold slows target locks and makes you harder to see on radar. Deploying your radiators redlines your signature – you are temporarily the hottest thing in space. Heat-seeking missiles love radiators more than countermeasures.
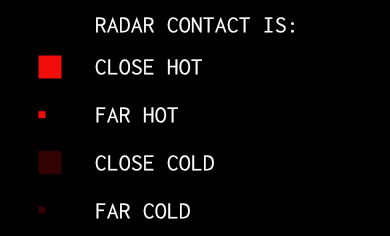
Radar
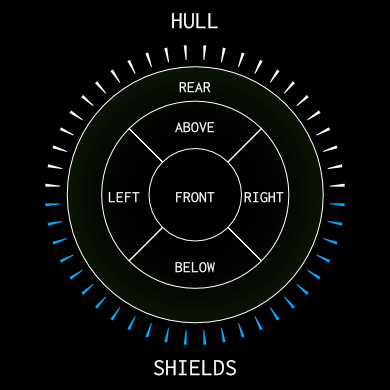
Your radar is divided into six arcs. To shoot the dots, maneuver so they’re in your front radar arc.
Hull/Shields
In addition to the health trackers around your radar display, when you take incoming fire the radar arc will flash red, indicating where the attack is coming from.
Scan
“I can see the enemy but can’t target them”. If your enemy is outside your max sensor range, you can hold your boresight targeting button to run a scan. This will double your radar range for several moments at the cost of maxing your signature, just as if you deployed radiators.
The Missile Knows Where It Is…
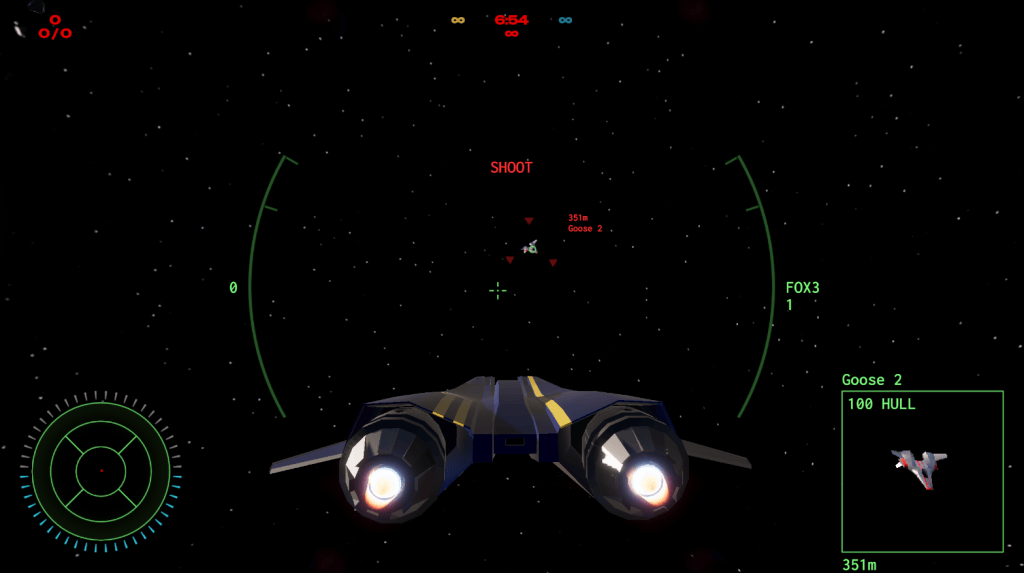
Let’s say you’re armed with a radar-guided missile and you want to shoot another ship.
- Keep your fighter nose-on to your enemy. You don’t need perfect precision, just keep them in the rough circle defined by your speed and heat tracks.
- Different weapons take different amounts of time to lock. You lock faster if the target’s signature is higher – if they’re boosting, firing frequently, or have deployed radiators.
- Fire once you’ve achieved lock. Your HUD will buzz and the targeting brackets will flash red. The missile chases until it runs out of fuel or is intercepted, either by countermeasures or lucky gunfire.
On the other end of this missile, things are a lot louder.
- When you are being locked by a radar-guided weapon, your HUD will beep with increasing urgency. This is your chance to shoot back or break line of sight or get out of range.
- A slow warble means you have been locked. This state often doesn’t last long.
- The fast warble means there is a missile on its way to meet you. Missiles are marked on your radar by red Xs and are shown on your HUD by red chevrons.
To Whom It May Concern
Heat-seeking missiles are not shipped with a tracking number. They do not care if they’re chasing a friend. They go after the highest-signature thing they detect. Generally that looks like:
- Open radiators
- Sensor scans
- Starfighters with heat above the “OVERHEAT” warning
- Countermeasures
- Boost
- Forward thrust
- Coasting
- Stealth hulls
Going In For Guns
Direct-fire weapons come in two basic flavors: hitscan and ballistic.
Hitscan
The shot hits where your reticle is.
Ballistic
A small lead indicator (the “pipper”) is added to your HUD with a dashed line pointing back at your target. Put your reticle in the pipper to hit your target.
Aim Assist
Space is vast and starfighters are fast. Targeting an enemy grants you a small amount of aim assist (as opposed to eyeballing it). Your reticle will turn red when, all else being equal, your weapon would hit your target.
Orientation
Or to put it another way, “where am I?” Space is big and empty but this is a swooshy video game with pew pews. It’s still possible to get turned around but we’ve added some things to help you navigate the battle spaces.
Out of Bounds
The most obvious clue that you are going the wrong way is the “out of bounds indicator”. This is a helpful cockpit voice telling you that you’re going to self-destruct if you don’t turn around and get back to the fight. The closest point back to the level boundary will be marked on your radar as a red waypoint.
Ejection – It’s Opposite Day!
The one exception to this rule is if you have to eject from your ship. When you eject, your lifepod has a limited about of life support. To get rescued, you need to get out of bounds. This time, the closest point to safety will be marked on your radar as a green waypoint. Get outside and you’ll get picked up, saving your team a life and denying the enemy some points.
Background Details
Next, you can use background details in each map to help navigate. There’s a common visual language in most of the maps:
- Teams spawn on opposite sides of the level’s horizontal plane, facing the center of the map.
- The map’s light source is almost always going to be coming from the “side” of the map. No team gets the sun at their back.
Objectives
If you are playing an objective-based game mode, critical objectives will be marked with icons above them. This will usually be a little skull if you’re supposed to blow something up or a little shield if you’re supposed to stop something from blowing up.
…Because It Knows Where It Isn’t
Remember that this is an early access document for a game that is still in development. I just happen to have a blog and this felt like a more convenient place for documentation than any other option.
If you are helping me test, I hope this helps in the absence of any real tutorials. If you have no idea what this is about, that’s okay too.


Leave a comment